How to use label varnishes to create packaging experiences that sell
Walk down any aisle in any store, and hundreds of labels will stare back, vying for your attention. Across product categories, the competition for consumer attention is stiff.
This competition is even more fierce for luxury products (including high-end wines, nutraceuticals, cosmetics, spirits), where premium label embellishments and decorations are key to justifying higher prices. And while no gold medals are awarded for labels that draw the consumer’s eye, sales are lost by those that don’t.
Decorative label varnishes are a powerful tool for brands looking to create a sophisticated label that stands out on a shelf (or website) lined with other luxury products.
Varnishes can even allow your brand to command higher prices. In fact, it’s been empirically proven. A study from California Polytechnic State University showed that consumers preferred packaging with tactile varnish over packaging without it. And soft-touch coatings even justified as much as a 5% price increase over non-coated packaging.
In this article, we’ll give a brief primer of the many uses for varnish before launching into five unique ways you can incorporate varnish to design a standout label that convinces consumers to put your product in their cart, literally or virtually.
Varnishes look good, but also serve a function
Label varnishes exist at the intersection of function and form:
- When it comes to function, varnishes can be used to prevent scuffing, protect against UV rays, allow for secondary thermal transfer printing (if you need to print a batch or lot code) and add other performance-related attributes to the label.
- When it comes to form, varnishes can be used to highlight specific areas of your design to create depth and contrast, incorporate a tactile dimension to your label or add a satin, gloss or matte sheen to all or part of your label. And that’s just the beginning.
- Form doesn’t have to follow function. One varnish, or a combination of varnishes, can work together to both protect your product label from wear and tear, and look good on the shelf.
5 ways to make your label pop with varnish
Many brand owners are familiar with the functional aspects of varnish — but the near-limitless ways to enhance the look of the label with varnish are less well understood.
Below, we’ll show premium brands how they can mix and match label varnish types (tactile, spot, pattern and more) to create standout label designs that sell.
But don’t make packaging design suggestions in a vacuum.
To decide what label embellishments will work best for your product — and whether decorative varnishes make sense — you’ll have to take a holistic look at your brand strategy, target consumers and the story you’re trying to tell with your packaging.
Check out this article to see the questions you need to ask ahead of changing your label.
1. Coat the entire label with a matte, satin or gloss varnish
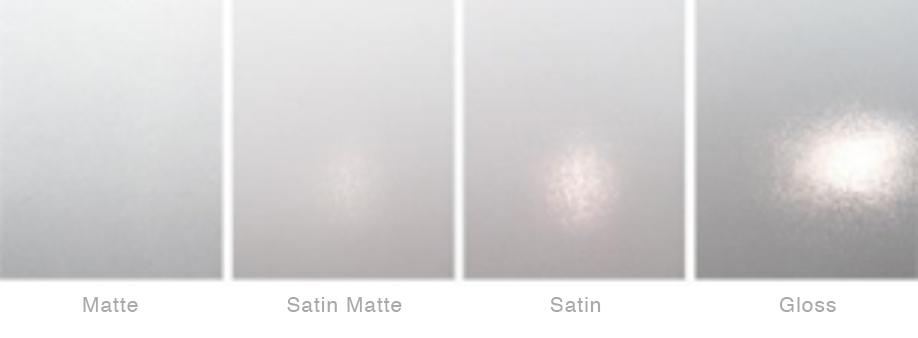
The simplest way to add flair to your label is to incorporate a matte, satin or gloss flood varnish. Flood varnishes — varnishes that coat your entire label surface — don’t require any special tooling and are required in many cases to protect your label graphics.
Still, you get a wide variety of finish options to customize your label. There’s a wide variety of satin, gloss and matte varnish options — many more varieties than the four finishes pictured above. And each varnish type can also be applied at different thicknesses to achieve different looks.
2. Use a spot varnish to highlight a key component of your label design
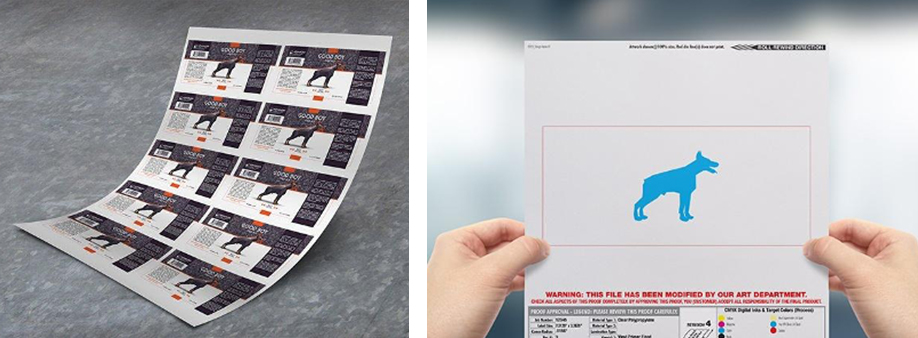
When a brand owner wants to create contrast between different parts of their design, or really wants to have a particular design element stand out, we’ll typically recommend a spot varnish like the one pictured above.
Spot varnishes (also referred to as selective varnishes) are useful for creating depth or highlighting specific areas of your label design. “Spot” refers to the application method; spot varnishes are selectively applied to specified areas of your design and require custom tooling and perfect registration.
The digital proof to the right shows where the spot gloss varnish would be applied over the label design — right over the dog. Because the name of the product is “Good Boy Pale Ale,” this embellishment fits neatly into their brand story.
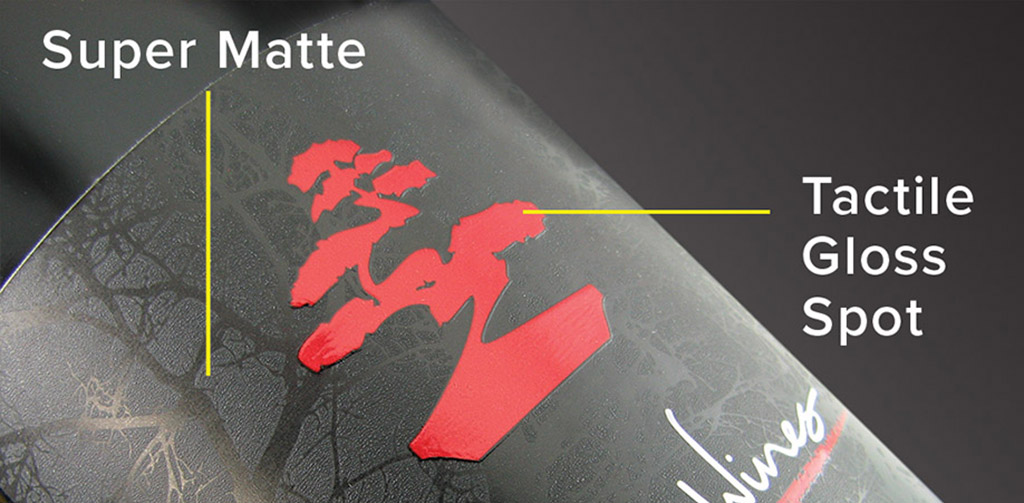
3. Combine spot varnishes to add depth and create focus
As pictured above, multiple spot varnishes can be employed on one label to add drama to your packaging:
- A super matte spot varnish is applied in the negative space of this label. The gray appearance of this spot varnish contrasts nicely with the black background to give a subtle impression of tree branches.
- Red tactile gloss spot varnish is used to draw the viewer’s eye to the bonsai tree in the middle — and adds a tactile experience to an otherwise two-dimensional printed product. Tactile varnishes are achieved using screen printing.
As a general rule of thumb regarding spot varnishes on black or dark-colored labels, remember that:
- Gloss spot varnishes will darken the appearance of rich blacks and deeper colors.
- Matte spot varnishes will lighten the appearance of rich blacks and deeper colors. On rich black labels, this can cause varnished areas to have a gray appearance. You can see an example of this in the label pictured above.
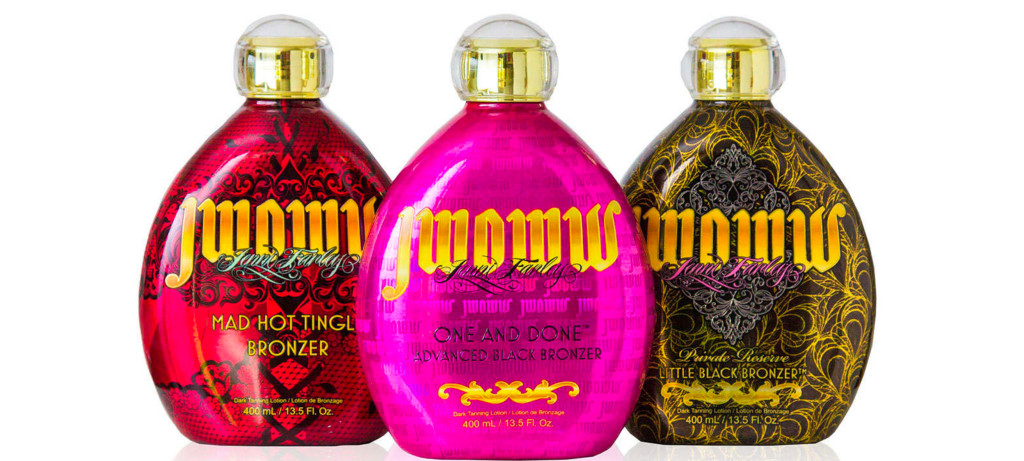
4. Add dimension to your label with a tactile pattern varnish
Pictured above are labels with pattern tactile varnishes. “Pattern” refers to the full-label application of a varnish in a special pattern.
Applying high-build tactile pattern varnish with screen printing can be a cost-effective alternative to embossing in some cases. We have a library of patterned screen-printing dies to choose from, eliminating the cost of tooling if you select an existing die.
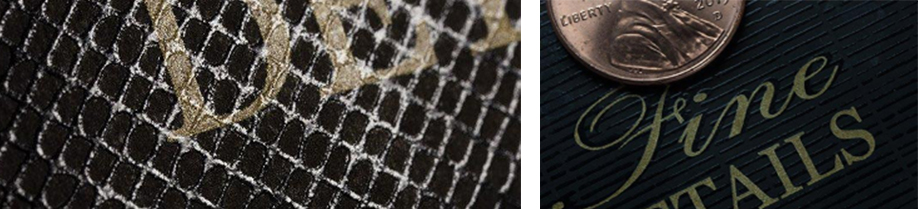
5. Highlight important text using selective tactile varnish
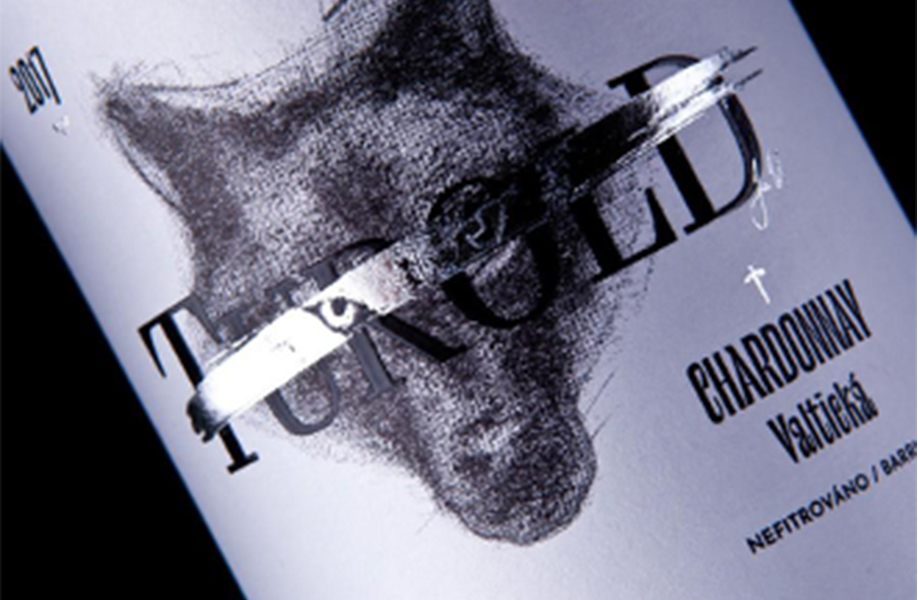
The label example pictured above employs high-build gloss varnish to highlight the brand name, “Turold.” The raised text not only adds a third dimension to the label, but it gives the text enough contrast to stand out against the metallic strikethrough in the design.
As a general rule of thumb when it comes to tactile varnishes, remember that:
- Gloss tactile varnishes, like the one shown in this label, tend to have a smooth, tacky feel to them.
- Matte tactile varnishes, on the other hand will be a bit rougher to the touch.
The photo above comes from M_use; more information can be found here.
How a label partner finds value for you
When you work with a label partner, you get more than just guidance about spot varnishes. See the National Reach, Local Touch difference for yourself.
Cost considerations for incorporating varnish into your label
- Standard flood varnish applications do not require custom tooling or additional passes on the press. They protect your labels from wear and tear, and do not add tooling costs.
- Each spot varnish you’d like to add to your label requires custom tooling, adding expense. That said, a label that results in a sales uplift or justifies a higher price is well worth the investment.
- Compared to embossing, pattern tactile varnishes can be a cost-effective option in many situations. Pattern varnishes that use an existing screen-printing die will not add tooling costs.
- Spot varnishes are possible on both digitally and flexographically printed labels. Which printing method is best for you will depend on several factors, namely run size. Your label converter will guide you toward the most cost-effective printing method to achieve your packaging vision.
Have any lingering questions about label varnishes?
We’re happy to answer questions you have about incorporating varnishes into your product label. Whether you know exactly what you want, or need help knowing where to start, we can help. Go ahead and schedule a consultation with our label experts to start the conversation.